Sunday 28 April 2013

Fideuà per MTC - marzo 2013


DSCN1773 - fideuà MTC march 2013 


Non so esprimere a parole quanto mi sia piaciuto questo piatto che è stato oggi il nostro pranzo domenicale.
Ottenuti sul filo di lana gli ingredienti all'ultimo minuto questa mattina...ho scoperto solo ora nel postare che ho preparato il piatto di marzo. Di marzo! Vi rendete conto? A marzo per la prima volta dall'inizio dell' MTC avevo saltato il turno e messo via i fogli già stampati della ricetta. L'ho riesumati ieri pensando che fosse la ricetta di aprile.

Un grazie speciale a Mai del blog Il colore della curcuma per avermi fatto scoprire questo piatto e le mie più sincere scuse ad Anne de The Food Blog che proponeva per questo mese la ricetta del Chili con carne che, prometto, farò mangiare a breva alla mia famiglia :)))  Voglio vedere se Alessandra trova una foto di commento per il premio smemorata-incasinata-fuoriconcorso-rosy. Ale? Questo me lo devi!

PS Non ho messo l'uovo nella salsa alioli che è stata pazientemente preparata nel mortaio genovese della nonna del webmaster dal Siarhei (leggi Sergej). 

Vi lascio alle parole di Mai.
Siete nel 1915, dentro la cambusa di un peschereccio e state navigando sul mare mediterraneo, nelle coste dei paesi catalani*. Fuori l'aria è salata e fresca. Tra poco dovrete servire il pranzo. Voi siete i cuochi, dovete cucinare per il capitano e i pescatori. Nel vostro calderone non mancano mai il pesce fresco di giornata, il brodo e mezzo pugno di riso a testa. Peccato però che il capitano pensi solo per sé mangiando sempre più del dovuto, lasciando gli altri a digiuno! Al capitano piace assai il riso col pesce… ma se invece del riso la prossima volta ci provate a mettere della pasta?

Immaginate...
Ci siete?
Fatto!

Nasce così la fideuà, da un pescatore di a Gandia (Valencia).


...LA FIDEUÀ

ingredienti per 6 persone:

600 gr. di "fideus" (potete farli spezzando degli spaghetti, 2/3 cm)
5 pomodori maturi
1 o 3 spichi d'aglio (a piacere)
350 gr. di calamari
350 di gamberi (io mazzancolle)
6 gamberoni
1/2 cucchiaino di paprica dolce
un pizzico di pistilli di zafferano
sale olio extra vergine


brodo
1 cipolla media
aqua, sale
pesce di roccia
(perché è più saporito, ma io mi sono adeguata a quello che ho trovato nel mercato:
tracima, muggine, razza, scorfano, nasello e qualche scarto di pesce spada e qualche testa di gambero)

per la salsa alioli
1 spichio d'aglio (ma se vi piace il sapore forte anche 3)
olió extra vergine (quanto basta per legare la salsa sui 100 ml)
sale
il rosso di un uovo (facoltativo)

Procedimento…
Mettere il pesce per il brodo in una pentola piena d'acqua fredda (2 l.) aggiungere la cipolla, sbucciata e fatta in 4 pezzi grossolani. Potete mettere anche qualche testa di gambero, per renderlo più saporito. Portare a ebollizione e togliere la schiummetta che si forma sopra, cuocere per 30/40 minuti. Dopo filtrare e tenere da parte a caldo.

Nella "paella" scaldare un filo d'olio, versarci i fideus e farli tostare il più omogeneamente possibile, devono diventare sul marroncino ma attenzione a non brucciarli troppo. Poi mettere da parte.

Aggiungere olio alla paella e cuocerci i gamberi, salare verso la fine e mettere da parte. Conviene munirsi di un recipiente, meglio con coperchio, per  preservare il pesce cotto e mantenendolo caldo. Se serve, aggiungere olio e cuocere i gamberoni, salare verso fine cottura e mettere in caldo. Passare ai calamari, puliti e fatti a pezzi, (ad anelli per capirci…) salare anche questi a fine cottura e unire al resto del pesce. Fate attenzione alle diverse cotture, il pesce fresco cuoce velocemente, ve la cavate in pochi minuti, ma aggiungete sempre abbastanza olio, perché vi servirà anche per il soffritto.

Lavare e sbucciare i pomodori. Se li fate sbollentare qualche minuto in acqua bollente è molto più facile, se non avete voglia potete usare il pela patate. Tagliuzzateli piccoli, piccoli. Sbucciare lo spicchio/spicchi d'aglio, fateli fini fini e soffriggere nell'olio, dopo qualche secondo aggiungerci i pomodori. Aggiungere una punta di zucchero, e più avanti correggere di sale. Se è necessario, (e lo sarà) bagnare con del brodo di pesce.
Quando il soffritto ha cambiato colore, si è ridotto e addensato, versare lo zafferano pestato nel mortaio e sciolto con un filo di brodo, amalgamare e aggiungere mezzo cucchiaino di paprica dolce. Dopo di che va versato il brodo, il sufficiente a coprire a pena a pena la pasta quando la andremo a buttare. Dovrete regolarvi a secondo la pentola o padella che avete a disposizione, ma meglio se questa è bassa e larga.
Quando il brodo comincia a sobbollire buttare la pasta, disporla omogeneamente su tutta la padella. Qui vanno controllati i tempi di cottura della pasta, la mia era 10 minuti, dopo i primi 4 minuti che cuoceva la pasta ci ho aggiunto i calamari e i gamberi, amalgamato e cotto fino ai 6 minuti restanti. Assaggiare se è giusto di sale e adagiare sopra i gamberoni.

La fideuà va sempre accompagnata dalla sua salsa, l'alioli, una salsina fatta soltanto con aglio, olio e sale, e tanto olio di gomito perché si fa dentro un mortaio. Ci vuole tanta pazienza e una trentina o quarantina di minuti. Di solito l'alioli lo fanno gli uomini di casa perché se una donna lo guarda la salsa impazzisce e si deve ricominciare da capo, ecco una buona scusa per dare un lavoretto ai maschi di casa:

-"Amore, tieni questo devi assolutamente farlo tu…!"

Si comincia con il mortaio appoggiato sul tavolo, pestando l'aglio 1o 3 spicchi, privi dell'anima e un pizzico di sale. Deve diventare una purea finissima, senza grumi. Dopodichè fate sedere il marito con il mortaio tra le gambe, in una mano il pestello e nell'altro l'oliera. Il preparato si deve girare e girare versando l'olio a filo, o meglio a goccia, sul mortaio ma non direttamente sull'impasto. Vedrete che dopo 15/20 minuti la salsa comincia a legare e a crescere. Magari il marito sarà stanco ma vi assicuro che l'orgoglio sarà salito con la salsa. Chiedete al tarantino...
Un'altra versione prevede l'aggiunta del rosso di un uovo. Questo va messo dopo che l'aglio è già purea, si amalgama e si procede con l'olio.


E per tutti quelli che sono stati valorosi e pazienti d'arrivare fino qua, se vi va, potete dare una occhiata al video, magari il profumo e la visione in diretta della fideuà vi aiuta nelle vostre creazioni! O magari rifate un'altra sessione di "training autogeno", tornate nella cambusa del peschereccio e guardatevi intorno. Prima però vi consiglio di andare a leggere tutte le regole e consigli dati dalle giudici del MTC.

Note e asterischi!

Vi consiglio di stare attenti al brodo, a mettere il necessario, meglio aggiungerlo in cottura a modo di risotto, che non metterne troppo, perché la pasta non riuscirebbe ad assorbirlo tutto e verrebbe una fideuà troppo brodosa.

Il pesce utilizzato per fare il brodo è quello che purtroppo ho trovato quel giorno. Il pescivendolo, che è sempre molto simpatico e cordiale, mi ha spiegato che essendo un periodo con molti maremoti e brutto tempo, il pesce di roccia fanno fatica a pescarlo. Ma devo dire che ho seguito i suoi consigli e il mix di pesci che mi ha dato più qualche mia aggiunta di qualche testa di gamberi è venuto molto saporito.

*...Con i re catalani, la corona d'Aragona prosperò e si espanse il modo che i suoi territori comprendevano Valencia, le isole di Mallorca, Sicilia, Corsica, Sardegna e Napoli. La corona d'Aragona divenne l'impero militare più potente e commerciale di tutto il Mediterraneo...".
Per un piatto così "giovane" la sua popolarità è tanta e tutti se ne prendono la paternità.
In realtà La fideuà non è proprio una ricetta catalana, ma si dei paesi catalani, tra i quali ne fa parte la Comunitat Valenciana, (lo stesso per la paella), in questo caso si da la paternità al cuoco di un peschereccio nativo di Gandia (Valencia).

Ringrazio tantissimo Ilaria e Alessio, due nostri amici, scelti non a caso per la loro pazienza e spirito di sopportazione, che carichi di telecamera e idee sono riusciti a fare "centinaia di riprese", e montare il video che vedete qua sotto.
Magari quella che presenta la ricetta non è il massimo, ma vi posso assicurare che le risate durante le riprese e dopo nel montaggio sono state tante, ma tante!
Anche se non so quale sarà la sua reazione la prossima volta che sentiranno "Fideuà" o "mortaio tra le gambe"!


Saturday 27 April 2013

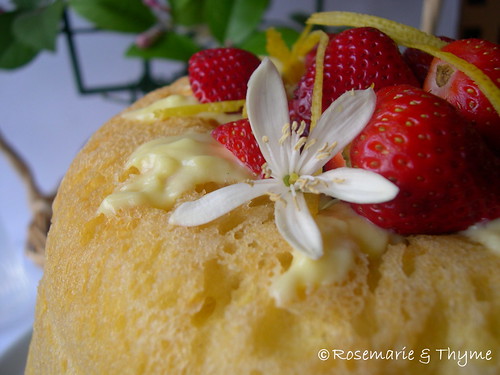
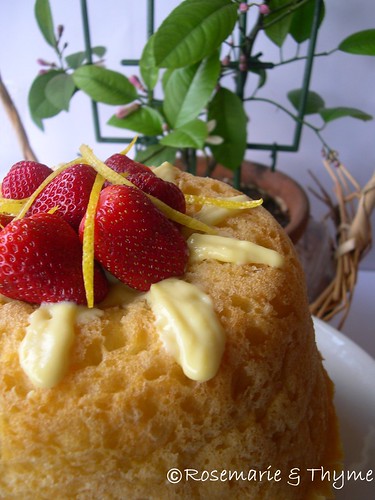
Savarin - Daring Bakers April 2013 Challange


DSCN1767 - savarin DB apr2013_2


Blog-checking lines: Natalia of Gatti Fili e Farina challenges us to make a traditional Savarin, complete with soaking syrup and cream filling! We were to follow the Savarin recipe but were allowed to be creative with the soaking syrup and filling, allowing us to come up with some very delicious cakes!


The only variation I made was to change the flavour of the syrup. I opted for a limoncello liqueur.

Limoncello Syrup:

LEMON FLAVOURED SAVARIN

Savarin
Scroll down for the recipe Natalia gave us.

Syrup
For 1 savarin

Ingredients
1 litre of water
300 g of sugar
300 ml of limoncello
zest of one lemon

Heat the water and add the sugar just before the water boils. Let boil for 5 minutes, set aside, add the lemon zests and when the syrup is warm take out the zests and add the limoncello liqueur.


I baked my savarin following the recipe's indications, but the savarin turned out whitish on the outside so next time I will set the oven to 180°C. I put the savarin back in a hot oven until it turned a nice golden colour.

As Natalia told us, this dessert takes its name after Jean Anthelme Brillat-Savarin. You might be interested to know that you can find his famous book The Physiology of taste in e-book format on Project Gutenberg's website


 Click on the version you prefer, English or French

The Physiology of Taste
Physiologie du goût

Folding dough
I found the following link interesting


DSCN1748 - savarin DB apr2013_1

And now here is what Natalia wrote for us.

PEACH FLAVOURED SAVARIN

Recipe Source: I must tell you that I tried many recipes (we are submerged in Savarins!) and the recipe I chose is a mix of the recipes from a very famous Italian Blogger, Adriano Continisio of Profumo di Lievito, and a very famous Italian Chef : Luca Montersino. He has his show on Alice TV, a cable channel that focuses on cooking . The link to their recipes are: http://profumodilievito.blogspot.it/2007/09/il-baba_15.html and http://www.alice.tv/dolci-dessert/savarin-chantilly-pesca. For the pastry cream I followed the recipe in Professional Baking by Wayne Gisslen. For the syrup I followed the recipe from Luca Montersino

Notes: This is a very rich dough but following Luca’s and Adriano’s tips and with the help of a mixer you won’t have any trouble!

The key is to know how to handle a very rich dough.
We need a very healthy and active dough with strong gluten bonds for this recipe but fat can inhibit this; so we have to develop the gluten well before adding any fat. For this reason I liked the fact that Adriano adds the yolks after the autolyse so as not to disturb the gluten at all. The salt crystals can cut the elastic strands of the gluten, too so they are added later. The butter is the last ingredient to be added.
.
After the first proofing we proceed to folds to strengthen the structure of our dough with the ‘Dough Package fold’ method that will result in a smaller and tighter crumb. After that the dough will be shaped on the work bench with a method called “Pirlatura” (that is used for Panettone as well) put in the pan, proofed , baked and then soaked in a flavored syrup. In my recipe I chose to fill the hole with what we, in Italy, call Chantilly that is a pastry cream thinned with whipped cream. And then I decorated it with fresh fruit.

Mandatory Items: You must use this recipe for the Savarin

Variations allowed: You can create your own syrup to soak the Savarin and choose a different filling to put in the ‘hole’ too!

Preparation time:

Sponge: 30 minutes
First Mixing and Autolyse: 35 minutes
Second Mixing: 35 minutes
Proofing: 2 to 3 hours
Shaping: 20 minutes
Final Rising: 1 to 1,1/2 hour
Syrup preparation: 15 minutes
Glaze preparation: 10 minutes
Pastry cream preparation: 30 minutes
Whipped cream preparation: 15 minutes
Baking: 40 minutes
Soaking: 1 hour
Glazing: 10 minutes

Equipment required:
Scale or measuring cups and spoons
Stand mixer with paddle and beater or hand held mixer with dough hooks and beaters or very motivated arms!
Dough scraper or spatula
Grater for lemon and orange zest
Knife for lemon and orange peel
Small bowl for the sponge
Bowl for egg whites
Bowl for yolks
Small bowl for butter
Saucepan for pastry cream
Bowl for Pastry cream
Saucepan for syrup
Saucepan for the glaze
Brush for the glaze
28 cm (11 inches) Savarin mold (springform or not)
Cling film
Cooling rack to let the cake drip
Pan that fits under the cooling rack to catch the drippings
Ladle
Big bowl for soaking the Savarin


Servings: 8/10

Ingredients
2½ cups (600 ml) (12-1/3 oz) (350 gm) bread flour
2 tablespoons (30 ml) water, lukewarm
6 (320 gm) large eggs at room temperature, separated
½ satchel (1½ teaspoons) (4 gm) instant yeast or 15 gm (½ oz) fresh yeast
4 teaspoons (20 ml) (20 gm) sugar
2/3 stick (1/3 cup) (80 ml) (75 gm) butter at room temperature
1 tablespoon (15 ml) (15 gm) (½ oz) orange and lemon zest (optional)
1 teaspoon (5 ml) (6 gm) salt
¼ cup (60 ml) (2 oz) (55 gm) butter for greasing the work surface, hands, dough scraper & baking pan

Directions:

Sponge
In a small bowl mix 2 tablespoons (30 ml) lukewarm water, 3 tablespoons (1 oz) (25 gm) flour and yeast , cover with cling film and let rise 60 minutes


Dough
1.After 30 minutes put the egg whites in the mixer bowl and start working with the paddle at low speed adding flour until you have a soft dough that sticks to the bowl (about 2 cups or 270 gm) and work until it comes together , cover with cling film and let rest 30 min
2.Add the sponge to the mixer bowl along with a tablespoon of flour and start mixing at low speed (if you wish to add the zests do it now)
3.When it starts pulling away from the sides of the bowl add one yolk and as soon as the yolk is absorbed add one tablespoon of flour
4.Add the second yolk , the sugar and as soon as the yolk is absorbed add one tablespoon of flour
5.Raise the speed a little
6.Add the third yolk and the salt and as soon as the yolk is absorbed add one tablespoon of flour
7.Keep on adding one yolk at the time and the flour saving a tablespoon of flour for later
8.Mix the dough until is elastic and makes threads
9.Add the butter at room temperature and as soon as the butter is adsorbed add the last tablespoon of flour
10.Keep on mixing till the dough passes the window pane test
11.Cover the dough with cling film and let it proof until it has tripled in volume 2 to 3 hours.
12.You can prepare the Pastry cream now if you chose to use it, and refrigerate it
13.While you wait prepare your baking pan buttering it very carefully not leaving too much butter on it
14.Grease your dough scraper, your hands and your work surface and put the dough on it and fold with the Dough Package Fold two or three times around (5 folds twice or three times). Cover with cling foil and let it rest 15 minutes on the counter
15.Turn the dough upside down and with the help of your buttered dough scraper shape your dough http://www.youtube.com/watch?v=ta2_h6Qogp0 in a rounded bun
16.Make a hole in the center with your thumb and put it in the prepared pan
17. Cover with cling film and let rise in a warm spot until the dough reaches the top of the pan about 1 hour
18.Pre-heat oven to moderate 340°F/180°C/gas mark 3 
19.Bake the Savarin for about 40 minutes until the top is golden brown
20.Meanwhile prepare the Syrup
21.When the Savarin is done take it out of the oven, let it cool and remove carefully out of the pan
22.You have two choices now : you can immerge it in syrup right away or you can let it dry out (so it will lose some of its moisture that will be replaced by the syrup) and soak it later on.
23.To immerge it in syrup it is a good idea to place it in the mold you baked it in (I’m afraid a spring-form one wouldn’t work for this) and keep adding ladles of syrup until you see it up to the rim of the pan. Or you can just soak it in a big bowl keeping your ladle on top of it so it doesn’t float. Once the Savarin is really well soaked carefully move it on a cooling rack positioned over a pan to let the excess syrup drip
24.The soaked Savarin gains in flavor the next day
25.Whatever you decide the day you want to serve it glaze it and fill the hole with your filling of choice and decorate it. You can serve the Savarin with some filling on the side
26.Enjoy it !

Peach Flavored Syrup:

Servings: 1 savarin

Ingredients
1½ cups (350 ml) peach tea
1½ cups (350 ml) peach juice
1½ cups (350 ml) water
1 cup (240 ml) (8 oz) (225 gm) sugar
zest of one lemon
one cinnamon stick

Directions:

1.Combine tea, water, sugar, lemon zest and cinnamon stick and bring to a boil
2.Let boil 5 minutes and remove from the stove
3.When cooled a bit add the peach juice.

Pastry Cream and Chantilly:

Servings: 1 savarin plus some for serving

Ingredients
2 cups (500 ml) milk
¼ cup (60 ml) (2 oz) (60 gm) sugar
zest of one lemon
2 large egg yolks
1 large egg
2 tablespoons (30 ml) (1¼ oz) (35 gm) cornstarch
¼ cup (60 ml) (2 oz) (60 gm) sugar
1 cup (250 ml) heavy cream

Directions:

1.In a saucepan bring to a boil milk and sugar
2.In a bowl whisk together egg yolks, egg, cornstarch and sugar
3.Add the hot milk to the eggs one tablespoon at the time to temper it
4.Pour in the saucepan again and bring to a boil stirring constantly
5.When the cream thickens remove from the stove
6.Put cling film onto the cream (touching the surface) and cool
7.Pour 1 cup (250 ml) cold heavy cream in mixer bowl with the whisk attachment
8.Beat until whipped
9.Combine with the cooled pastry cream adding a tablespoon at the time of whipped cream until it gets to the right consistency. Or it looks right to you !

Glaze:

Servings: 1 savarin

Ingredients
2 tablespoons (30 ml) apricot Jam
2 tablespoons water

Directions:

1.In a saucepan mix jam and water and warm up
2.When the savarin is cool and soaked brush it with the glaze

Storage & Freezing Instructions/Tips:

You can store the dried savarin for 5 days in a airtight container. If you have soaked it, cover well with cling foil and store it in the refrigerator for up to 5 days.

Additional Information:
Folding http://www.youtube.com/watch?v=ta2_h6Qogp0

Disclaimer:

The Daring Kitchen and its members in no way suggest we are medical professionals and therefore are NOT responsible for any error in reporting of “alternate baking/cooking”. If you have issues with digesting gluten, then it is YOUR responsibility to research the ingredient before using it. If you have allergies, it is YOUR responsibility to make sure any ingredient in a recipe will not adversely affect you. If you are lactose intolerant, it is YOUR responsibility to make sure any ingredient in a recipe will not adversely affect you. If you are vegetarian or vegan, it is YOUR responsibility to make sure any ingredient in a recipe will not adversely affect you. The responsibility is YOURS regardless of what health issue you’re dealing with. Please consult your physician with any questions before using an ingredient you are not familiar with. Thank you!